Pressure Ratings
Pressure Ratings for Pipes, Tubes and Fittings
Wall thickness calculations for straight pipe under internal pressure
The following equations and tables are based on those provided in the Process Piping Specification, ASME B31.3a-2008, ASME Code for Pressure Piping (see Notes for references to source paragraphs and tables in this specification).
Firstly, any one of the following four equations may be used to calculate the ‘pressure design wall thickness’ (t) of a straight pipe subject to internal pressure.
The equations assume t<D/6 (for pipe with t >D/6 or P/SE >0.385 additional factors need to be considered). The four alternative equations are:
where:
t = Pressure design thickness
d = Inside diameter of pipe. For pressure design calculation, the inside diameter of the pipe is the maximum value allowable under the purchase specification.
P = Internal design pressure.
D = Outside diameter pipe as listed in tables of standards or specifications or as measured.
E = Quality factor. See the table “Basic quality factors ‘E’ for longitudinal weld joints in stainless steel pipes, tubes and fittings” on page 27.
S = Stress value for material from the table “Basic allowable stresses ‘S’ in tension for stainless steels” on pages 28-29.
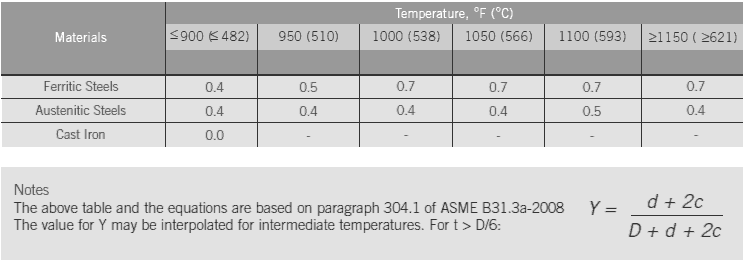
Y = Coefficient from table “Values of coefficient ‘Y’ for t<D/6” on pages 28-29.
Secondly, the minimum required wall thickness tm of straight sections of pipe is determined in accordance with the following equation.
where:
tm= Minimum required thickness, including mechanical, corrosion and erosion allowances.
c = The sum of the mechanical allowances (thread or groove depth) plus corrosion and erosion allowances. For threaded components, the nominal thread depth (dimension h of ASME B1.20.1, or equivalent) shall apply. For machined surfaces or grooves where the tolerance is not specified, the tolerance shall be assumed to be 0.5 mm (0.02 in) in addition to the specified depth of the cut.
The actual minimum thickness for the pipe selected, considering manufacturer’s tolerance, shall not be less than tm.
Units of Measure for Calculations It is important to use compatible units for pressure calculations. ASTM and ASME specifications are based upon imperial sizes.
The equations above may also be used for pipe bends provided the requirement for minimum wall thickness ™ is met.
Further Information
Refer to ASME B31.3a-2008 paragraph 304 for further details relating to pressure rating and wall thickness calculations applicable to elbows, branch connections, closures, flanges, reducers and other components.
Values of Coefficient ‘Y’ for t<D/6


